> ## Documentation Index
> Fetch the complete documentation index at: https://ppio.com/docs/llms.txt
> Use this file to discover all available pages before exploring further.
# 10 分钟部署你的 AI 助手
> 零基础新手教程:从安装 Python 到用 PPClaw 一键部署 OpenClaw AI 助手,10 分钟完成。
已有 Python 开发经验?可以直接看[部署与集成指南](/sandbox/integrate-openclaw),有更完整的命令参考和 API 集成说明。
这篇教程带你从零开始,一步步在云端部署属于你自己的 [OpenClaw](https://github.com/nicepkg/openclaw) AI 助手。不需要任何编程基础,跟着做就行。
## 第一步:给电脑装上 Python
PPClaw 是一个基于 Python 的小工具,所以需要先在电脑上装好 Python。
### Windows 用户(最关键的一步)
1. [点击这里下载 Python 安装包](https://www.python.org/downloads/)
2. 双击打开安装包
**务必勾选底部的** `Add Python to PATH`。这是新手最容易漏掉的地方,不勾选的话后面所有命令都会报错。
3. 点击 `Install Now`,等到看到 `Setup was successful` 就可以关掉了
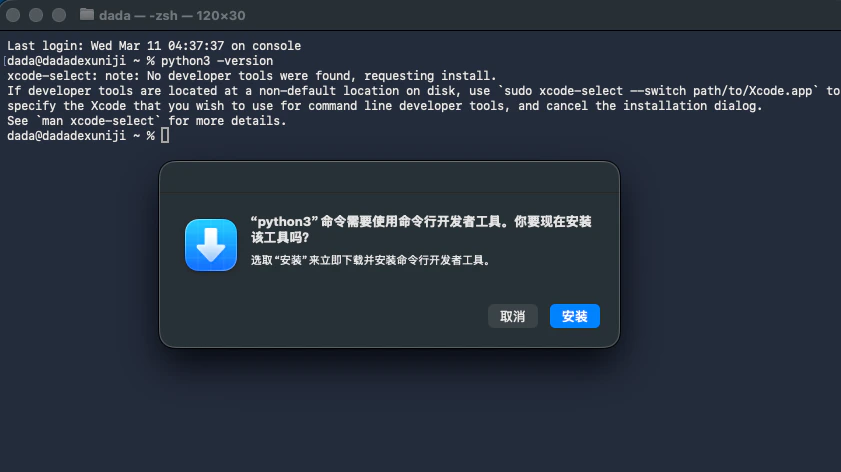
### macOS 用户
1. 按 `Command + 空格`,搜索"终端"(Terminal)并打开
2. 输入下面这行命令,按回车:
```bash theme={null}
python3 --version
```
* 如果显示 `Python 3.x.x`,说明已经装好了,直接跳到下一步
* 如果弹出下面这样的提示,点**安装**,等几分钟就好
 ### Linux(Ubuntu)用户
打开终端,输入:
```bash theme={null}
sudo apt update && sudo apt install python3 python3-pip -y
```
## 第二步:获取你的 API Key
你需要一个 API Key(可以理解为"通行密钥")来连接 PPIO 的云端 AI 环境。
1. 打开 [PPIO Key Management](https://ppio.com/docs/support/api-key) 页面并注册登录
2. 点击\*\*「创建 API Key」\*\*
3. 你会看到一串以 `sk_` 开头的字符串,复制下来找个地方存好
API Key 只在创建时显示一次,关掉页面就看不到了,记得及时复制保存。
## 第三步:安装并启动
打开你的终端窗口(Windows 叫 **PowerShell**,macOS 叫**终端**)。
### 安装 PPClaw
macOS / Linux 用户输入:
```bash theme={null}
curl -fsSL https://ppclaw.ppio.com/install.sh | bash
```
Windows 用户在 PowerShell 中输入:
```powershell theme={null}
irm https://ppclaw.ppio.com/install.ps1 | iex
```
也可以通过 pipx 安装:
```bash theme={null}
pipx install ppclaw
```
安装完成后,输入下面的命令验证一下:
```bash theme={null}
ppclaw --help
```
如果看到类似下面这样的输出,就表示安装成功了:
```text theme={null}
Usage: ppclaw [OPTIONS] COMMAND [ARGS]...
PPClaw - One-click launch of OpenClaw on PPIO Agent Sandbox.
Options:
--version Show the version and exit.
--json / -j Output as JSON (for programmatic use).
--help Show this message and exit.
Commands:
doctor Diagnose and fix sandbox issues
launch Create and start a new sandbox
list List all running sandboxes
status Show sandbox status
stop Stop and remove a sandbox
update Check for updates and upgrade to the latest version
```
看到 `Commands` 下面列出了 `launch`、`list` 这些命令,说明一切就绪。
macOS 用户如果碰到 `command not found` 报错,说明需要配置一下环境变量。按顺序运行下面两行命令:
```bash theme={null}
echo 'export PATH="'$(python3 -m site --user-base)'/bin:$PATH"' >> ~/.zshrc
source ~/.zshrc
```
运行完再试一次 `ppclaw --help` 就好了。
### 启动你的 AI 助手
输入下面这行命令,把 `<你的 API Key>` 替换成你刚才保存的那串密钥:
```bash theme={null}
ppclaw launch --api-key <你的 API Key>
```
等大约 50 秒,看到类似下面的输出就说明创建好了:
```text theme={null}
+-------------------- PPClaw Sandbox Ready --------------------+
| Sandbox ID: abc123def456-fb47b43e |
| Keep Alive: 604800s |
| |
| Gateway WS: wss://18789-xxx.sandbox.ppio.cn |
| Gateway Token: xYz1234abcd |
| Web Terminal: https://7681-xxx.sandbox.ppio.cn |
| File Manager: https://7682-xxx.sandbox.ppio.cn |
| Services User: admin |
| Services Password: <随机生成> |
+--------------------------------------------------------------+
▶ Web UI: https://18789-xxx.sandbox.ppio.cn#token=xYz1234abcd
```
其中几个关键信息:
* **Sandbox ID** — 沙箱的唯一编号,后续管理(查看状态、停止)时会用到
* **Web UI** — 这就是你的 AI 助手地址,复制到浏览器打开就能用。Token 已自动附在链接里,打开即完成认证
* **Web Terminal** — 浏览器里的终端,可以直接在沙箱内执行命令
* **File Manager** — 网页文件管理器,支持上传 / 下载 / 删除沙箱内的文件
* **Services User / Password** — Web Terminal 和 File Manager 的登录凭据(每次 launch 自动生成随机密码)
复制 `Web UI` 那一行后面的链接地址,粘贴到浏览器里打开,就能开始和你的 AI 助手对话了。
### 为旧沙箱添加 Web Terminal 和 File Manager
如果你的沙箱是在 v1.3.0 之前创建的,运行 `ppclaw status` 时不会看到 Web Terminal 和 File Manager 的地址——这是因为旧版模板没有预装这两个服务。
只需一行命令即可补装:
```bash theme={null}
ppclaw services setup --api-key <你的 API Key>
```
它会自动完成以下操作:
1. 下载并安装 ttyd 和 gohttpserver
2. 生成登录凭据并启动服务
3. 输出访问地址和凭据信息
如果沙箱已经配置过这两个服务,命令会直接显示现有的凭据信息,不会重复安装。
用完之后记得停掉沙箱,释放资源:
```bash theme={null}
ppclaw stop --api-key <你的 API Key>
```
## 常用命令速查
| 命令 | 干什么用 | 怎么写 |
| ----------------------- | ---------------------------------- | ----------------------------------------------------- |
| `ppclaw launch` | 创建一个新的 AI 助手 | `ppclaw launch --api-key sk_xxx` |
| `ppclaw list` | 看看你有哪些正在运行的助手 | `ppclaw list --api-key sk_xxx` |
| `ppclaw list -q` | 只输出沙箱 ID(方便脚本使用) | `ppclaw list --api-key sk_xxx -q` |
| `ppclaw status` | 查看某个助手的运行状态 | `ppclaw status --api-key sk_xxx ` |
| `ppclaw stop` | 停掉并删除某个助手 | `ppclaw stop --api-key sk_xxx ` |
| `ppclaw doctor` | 助手出问题了,用它来诊断修复 | `ppclaw doctor --api-key sk_xxx ` |
| `ppclaw services setup` | 为旧沙箱补装 Web Terminal 和 File Manager | `ppclaw services setup --api-key sk_xxx ` |
| `ppclaw update` | 检查并升级到最新版本 | `ppclaw update` |
如果网络比较慢,创建过程超时了,可以加大等待时间试试:
```bash theme={null}
ppclaw launch --api-key sk_xxx --timeout 120
```
## 进阶:用 AI Agent 直接管理沙箱
除了在终端手动输入命令,PPClaw 还支持两种方式让 AI Agent 替你操作沙箱。
### 方式一:MCP 协议接入
PPClaw 支持 [Model Context Protocol (MCP)](https://modelcontextprotocol.io/),AI 应用可通过标准协议直接管理沙箱。
* **端点地址**:`https://ppclaw.ppio.com/mcp`(Streamable HTTP)
* **认证方式**:`Authorization: Bearer `
* **10 个工具**,覆盖完整沙箱生命周期:`launch`、`stop`、`list_sandboxes`、`status`、`doctor`、`gateway_update`、`gateway_restart`、`services_setup`、`pair_list`、`pair_approve`
在 Claude Code 中一行命令即可接入:
```bash theme={null}
claude mcp add --transport http ppclaw https://ppclaw.ppio.com/mcp \
-H "Authorization: Bearer "
```
也可在 Cursor、Windsurf 等支持 MCP 的客户端中配置使用。配置完成后,在 Agent 输入框中直接用自然语言操作:
```text theme={null}
Launch a new OpenClaw sandbox and give me the Web UI URL
```
### 方式二:让 AI 读取 Skill.md 自动操作
PPClaw 提供了一个专为 AI Agent 设计的使用指南:`https://ppclaw.ppio.com/skill.md`,包含完整的安装、配置和操作说明。
无需任何配置,在任意 AI Agent 输入框中输入:
```text theme={null}
Read https://ppclaw.ppio.com/skill.md and follow the onboarding instructions
```
Agent 会自动获取文档、安装 PPClaw CLI、配置 API Key 并启动沙箱。
## 常见问题
遇到问题别着急,先对照下面的表格排查一下:
| 遇到什么问题 | 为什么会这样 | 怎么办 |
| ----------------------------- | ---------------------------------- | -------------------------------------------------- |
| 提示"不是内部或外部命令" | 装 Python 时没勾选 `Add Python to PATH` | 卸载 Python 重新装一遍,**记得勾选底部的勾** |
| 提示 `Permission Denied` | 权限不足 | Windows:右键选择"以管理员身份运行";macOS / Linux:命令前面加上 `sudo` |
| API Key 提示 Invalid | Key 可能复制不完整,或者前后多了空格 | 回到控制台重新复制一遍,注意 `sk_` 前后不要有多余空格 |
| macOS 上 `pip install` 提示命令找不到 | macOS 为了区分版本,把安装工具叫做 `pip3` | 把命令里的 `pip` 换成 `pip3` 就行 |
| 停止沙箱没有反应 | 停止会清空沙箱里所有内容,需要你手动再确认一次 | 在终端里输入 `y` 然后按回车 |
### Linux(Ubuntu)用户
打开终端,输入:
```bash theme={null}
sudo apt update && sudo apt install python3 python3-pip -y
```
## 第二步:获取你的 API Key
你需要一个 API Key(可以理解为"通行密钥")来连接 PPIO 的云端 AI 环境。
1. 打开 [PPIO Key Management](https://ppio.com/docs/support/api-key) 页面并注册登录
2. 点击\*\*「创建 API Key」\*\*
3. 你会看到一串以 `sk_` 开头的字符串,复制下来找个地方存好
API Key 只在创建时显示一次,关掉页面就看不到了,记得及时复制保存。
## 第三步:安装并启动
打开你的终端窗口(Windows 叫 **PowerShell**,macOS 叫**终端**)。
### 安装 PPClaw
macOS / Linux 用户输入:
```bash theme={null}
curl -fsSL https://ppclaw.ppio.com/install.sh | bash
```
Windows 用户在 PowerShell 中输入:
```powershell theme={null}
irm https://ppclaw.ppio.com/install.ps1 | iex
```
也可以通过 pipx 安装:
```bash theme={null}
pipx install ppclaw
```
安装完成后,输入下面的命令验证一下:
```bash theme={null}
ppclaw --help
```
如果看到类似下面这样的输出,就表示安装成功了:
```text theme={null}
Usage: ppclaw [OPTIONS] COMMAND [ARGS]...
PPClaw - One-click launch of OpenClaw on PPIO Agent Sandbox.
Options:
--version Show the version and exit.
--json / -j Output as JSON (for programmatic use).
--help Show this message and exit.
Commands:
doctor Diagnose and fix sandbox issues
launch Create and start a new sandbox
list List all running sandboxes
status Show sandbox status
stop Stop and remove a sandbox
update Check for updates and upgrade to the latest version
```
看到 `Commands` 下面列出了 `launch`、`list` 这些命令,说明一切就绪。
macOS 用户如果碰到 `command not found` 报错,说明需要配置一下环境变量。按顺序运行下面两行命令:
```bash theme={null}
echo 'export PATH="'$(python3 -m site --user-base)'/bin:$PATH"' >> ~/.zshrc
source ~/.zshrc
```
运行完再试一次 `ppclaw --help` 就好了。
### 启动你的 AI 助手
输入下面这行命令,把 `<你的 API Key>` 替换成你刚才保存的那串密钥:
```bash theme={null}
ppclaw launch --api-key <你的 API Key>
```
等大约 50 秒,看到类似下面的输出就说明创建好了:
```text theme={null}
+-------------------- PPClaw Sandbox Ready --------------------+
| Sandbox ID: abc123def456-fb47b43e |
| Keep Alive: 604800s |
| |
| Gateway WS: wss://18789-xxx.sandbox.ppio.cn |
| Gateway Token: xYz1234abcd |
| Web Terminal: https://7681-xxx.sandbox.ppio.cn |
| File Manager: https://7682-xxx.sandbox.ppio.cn |
| Services User: admin |
| Services Password: <随机生成> |
+--------------------------------------------------------------+
▶ Web UI: https://18789-xxx.sandbox.ppio.cn#token=xYz1234abcd
```
其中几个关键信息:
* **Sandbox ID** — 沙箱的唯一编号,后续管理(查看状态、停止)时会用到
* **Web UI** — 这就是你的 AI 助手地址,复制到浏览器打开就能用。Token 已自动附在链接里,打开即完成认证
* **Web Terminal** — 浏览器里的终端,可以直接在沙箱内执行命令
* **File Manager** — 网页文件管理器,支持上传 / 下载 / 删除沙箱内的文件
* **Services User / Password** — Web Terminal 和 File Manager 的登录凭据(每次 launch 自动生成随机密码)
复制 `Web UI` 那一行后面的链接地址,粘贴到浏览器里打开,就能开始和你的 AI 助手对话了。
### 为旧沙箱添加 Web Terminal 和 File Manager
如果你的沙箱是在 v1.3.0 之前创建的,运行 `ppclaw status` 时不会看到 Web Terminal 和 File Manager 的地址——这是因为旧版模板没有预装这两个服务。
只需一行命令即可补装:
```bash theme={null}
ppclaw services setup --api-key <你的 API Key>
```
它会自动完成以下操作:
1. 下载并安装 ttyd 和 gohttpserver
2. 生成登录凭据并启动服务
3. 输出访问地址和凭据信息
如果沙箱已经配置过这两个服务,命令会直接显示现有的凭据信息,不会重复安装。
用完之后记得停掉沙箱,释放资源:
```bash theme={null}
ppclaw stop --api-key <你的 API Key>
```
## 常用命令速查
| 命令 | 干什么用 | 怎么写 |
| ----------------------- | ---------------------------------- | ----------------------------------------------------- |
| `ppclaw launch` | 创建一个新的 AI 助手 | `ppclaw launch --api-key sk_xxx` |
| `ppclaw list` | 看看你有哪些正在运行的助手 | `ppclaw list --api-key sk_xxx` |
| `ppclaw list -q` | 只输出沙箱 ID(方便脚本使用) | `ppclaw list --api-key sk_xxx -q` |
| `ppclaw status` | 查看某个助手的运行状态 | `ppclaw status --api-key sk_xxx ` |
| `ppclaw stop` | 停掉并删除某个助手 | `ppclaw stop --api-key sk_xxx ` |
| `ppclaw doctor` | 助手出问题了,用它来诊断修复 | `ppclaw doctor --api-key sk_xxx ` |
| `ppclaw services setup` | 为旧沙箱补装 Web Terminal 和 File Manager | `ppclaw services setup --api-key sk_xxx ` |
| `ppclaw update` | 检查并升级到最新版本 | `ppclaw update` |
如果网络比较慢,创建过程超时了,可以加大等待时间试试:
```bash theme={null}
ppclaw launch --api-key sk_xxx --timeout 120
```
## 进阶:用 AI Agent 直接管理沙箱
除了在终端手动输入命令,PPClaw 还支持两种方式让 AI Agent 替你操作沙箱。
### 方式一:MCP 协议接入
PPClaw 支持 [Model Context Protocol (MCP)](https://modelcontextprotocol.io/),AI 应用可通过标准协议直接管理沙箱。
* **端点地址**:`https://ppclaw.ppio.com/mcp`(Streamable HTTP)
* **认证方式**:`Authorization: Bearer `
* **10 个工具**,覆盖完整沙箱生命周期:`launch`、`stop`、`list_sandboxes`、`status`、`doctor`、`gateway_update`、`gateway_restart`、`services_setup`、`pair_list`、`pair_approve`
在 Claude Code 中一行命令即可接入:
```bash theme={null}
claude mcp add --transport http ppclaw https://ppclaw.ppio.com/mcp \
-H "Authorization: Bearer "
```
也可在 Cursor、Windsurf 等支持 MCP 的客户端中配置使用。配置完成后,在 Agent 输入框中直接用自然语言操作:
```text theme={null}
Launch a new OpenClaw sandbox and give me the Web UI URL
```
### 方式二:让 AI 读取 Skill.md 自动操作
PPClaw 提供了一个专为 AI Agent 设计的使用指南:`https://ppclaw.ppio.com/skill.md`,包含完整的安装、配置和操作说明。
无需任何配置,在任意 AI Agent 输入框中输入:
```text theme={null}
Read https://ppclaw.ppio.com/skill.md and follow the onboarding instructions
```
Agent 会自动获取文档、安装 PPClaw CLI、配置 API Key 并启动沙箱。
## 常见问题
遇到问题别着急,先对照下面的表格排查一下:
| 遇到什么问题 | 为什么会这样 | 怎么办 |
| ----------------------------- | ---------------------------------- | -------------------------------------------------- |
| 提示"不是内部或外部命令" | 装 Python 时没勾选 `Add Python to PATH` | 卸载 Python 重新装一遍,**记得勾选底部的勾** |
| 提示 `Permission Denied` | 权限不足 | Windows:右键选择"以管理员身份运行";macOS / Linux:命令前面加上 `sudo` |
| API Key 提示 Invalid | Key 可能复制不完整,或者前后多了空格 | 回到控制台重新复制一遍,注意 `sk_` 前后不要有多余空格 |
| macOS 上 `pip install` 提示命令找不到 | macOS 为了区分版本,把安装工具叫做 `pip3` | 把命令里的 `pip` 换成 `pip3` 就行 |
| 停止沙箱没有反应 | 停止会清空沙箱里所有内容,需要你手动再确认一次 | 在终端里输入 `y` 然后按回车 |